The best apple pie ever. Seriously 

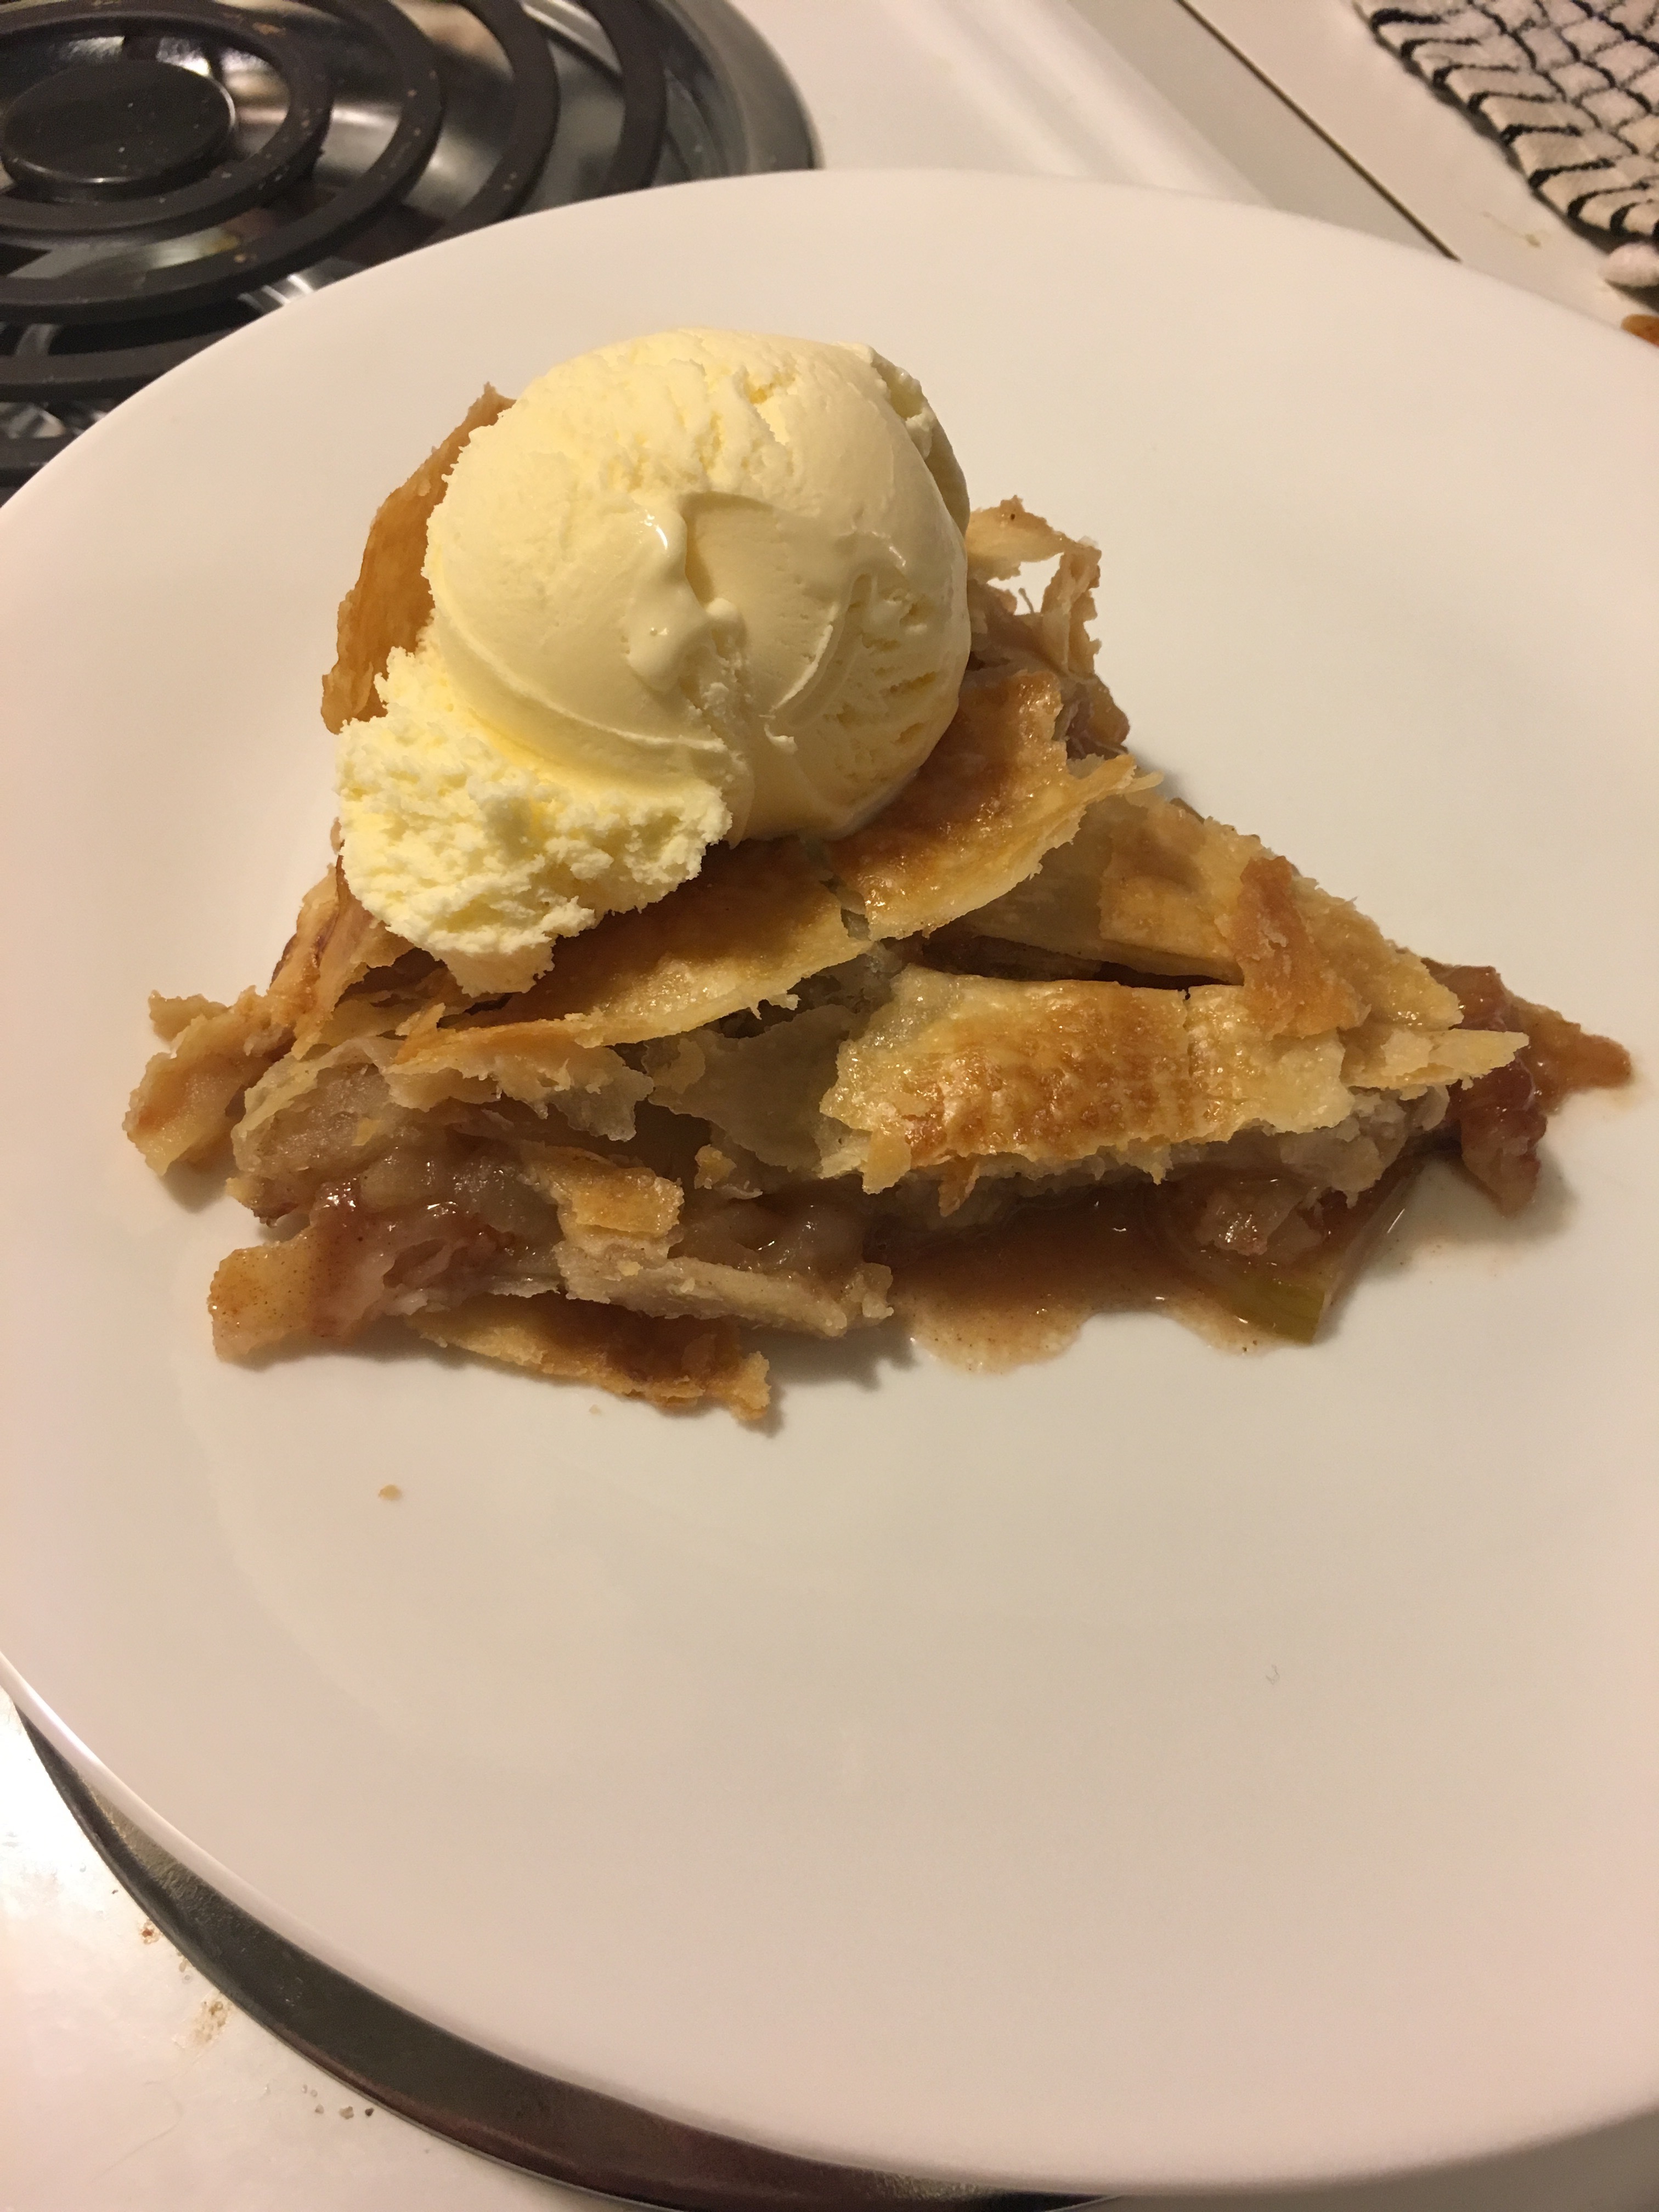
So I skipped prep and decided to just get the basics and make an apple pie, which I haven’t actually done in a pretty long time. Now this recipe utilizes the amazing and magical properties of CAST IRON! Cast iron is a beautiful way to cook and clean up is always a breeze, because all you do is rinse with hot water, dry, and wipe down with oil. It’s naturally non-stick, and adds a dash of iron into your food when you cook with it (ladies naturally need more iron in their diets), and it’s heavy enough to be used as a weapon during a breaking and entering. You can fry chicken, sear a steak, and make the best damn apple pie you will ever taste. Trust me. 

The best cast iron apple pie ever

3 large Granny Smith apples peeled and sliced 

3 large Braeburn apples peeled and sliced 

3/4C. White sugar

Pinch of salt 

1 tbsp. apple pie seasoning (cinnamon, nutmeg, allspice) 

3 tbsp flour 

1 stick unsalted butter

1C. Brown sugar

1 pkg of 2 refrigerated pie crusts 

1 egg white

2tsp water 

1. Preheat oven to 350 degrees 

2. Toss apples in white sugar and a pinch of salt, place in a colander over a bowl and allow to drain for 1 hour, save the liquid. 

2. After apples are drained place liquid in a small saucepan and reduce by half 5-10 minutes, allow to cool. 

3. Toss drained apples in flour and apple pie spice, drizzle cooled reduced apple pie liquid over apples and toss again.

4. Heat butter in cast iron skillet over medium heat, add brown sugar and cook for about 2 minutes stirring constantly with a wooden spoon. Remove from heat and cool slightly. 

5. Lay first layer of pie crust over top the brown sugar mixture, then arrange the apples slightly overlapping around the bottom of the crust. Make sure to pour any liquid left in the bowl over top. Add second pie crust over top, cutting 4 slits in the top to allow steam to escape. 

6. Whip egg white and water with a fork until foamy, brush over the entire crust to create a light glaze, then sprinkle with about 2 tsp. white sugar.  

7. Bake for 1 hour and 10 minutes, checking periodically for browning (you can cover with aluminum foil to prevent overbrowning as needed) I turn my pie at 35 minutes to ensure even browning.

8. Remove from oven and allow to cool for 30 minutes (seriously, no touching! This is important! If you cut it hot, all that juice will run everywhere, if you let it cool that juice has a time to set and hold everything in nice slices) 

As the old saying goes, “to make an apple pie from scratch you must first invent the universe” -Carl Sagan

The real MPP 


Meal prep basics part 2

Okay, you survived meal prep basics part 1. Welcome to meal prep basics part 2! So you have all of your fresh delicious food ingredients in your fridge, now what? Let’s get cooking of course! 

The most important part of meal prepping is following S.O.S which stands for “sanitation, organization, and safety” first off you want to completely sanitize all food surfaces with a spray or Lysol wipe, empty the sink of all dishes and give that a good wipe down, make sure your dishwasher is empty (trust me you will be filling it up by the end of this) keep your Lysol wipes handy and nearby for cleaning up after preparing raw poultry, beef, fish, and pork. 

Organize yourself accordingly, I take my largest bowl I own and put a grocery bag liner in it and that becomes my garbage bowl, keep it nearby for handy disposal. Prep all your fruits and vegetables first, chop everything for a stir fry, wash and thoroughly dry all salad mix, fruits and veggies. Box up your fresh fruit snacks or veggie snacks. Next I prepare my starches like rice and quinoa, I cook them according to the recipe I am using, then I spread them on lined sheet trays to cool in the refrigerator. Once that’s done I move on to protein items, I cut, clean and cook all my chicken breast at once (unless it’s for a specific recipe) same with beef and pork. Stick to the recipe!!!! 

Now safety, this is where it gets just a touch complicated. Foods if not eaten right away have to be cooled as fast as possible to avoid too much time in “the temperature danger zone” which is the ideal temperature for bacteria to grow this range is 41-135 degrees F. With that in mind, don’t leave things to cool at room temperature if you can help it. Take your chicken off the hot pan and put it in the cooler right away, for soups, stews, and chilis take the pot and submerge it in a sink full of ice water, stir every few minutes until cold (replenishing ice as needed) then portion, cover, and refrigerate. If things are still a little warm after they are portioned, leave the lid cracked to allow steam and heat to escape. Use a separate knife and cutting board for all raw meat, do NOT flip the cutting board over to cut veggies on, that is how salmonella happens. Completely wipe the space with a Lysol wipe and get out a clean knife and cutting board before moving on. 

Reheating is pretty self explanatory, microwave, throw in a pan, and heat well… 

Congratulations! With these simple tricks and tips YOU are now ready to begin meal prepping like a pro!! I believe in you, you can do it! Now there are no extra dishes to wash during the week, no more running out on lunch break for a cheap gross fast food burger, make all your friends and family jealous with all your fabulous and tasty food and the best of all? You get to eat a HEALTHY well balanced meal every single day, snacks included! What’s not to love? 

Cook fearlessly! 

The meal prep princess 

Meal prep basics part 1

Okay, for anyone who has ever been on Pinterest I’m sure you have seen pages upon pages of beautifully boxed and portioned prep meals all lined up on the counter in neat nutritious perfection. It’s a little intimidating I know, actually it’s a lot intimidating especially for a first timer. But relax, I have all the tips to success (after many weeks of trial and error). 

The most important part of prep is your list! There will be 3 lists. 

List 1: decide ahead of time what you are going to make. Since I prep for 2 people for the week I make 3 different dishes of 6 boxes of each item. Once you have decided what to make, find your recipes if need be. It can be as easy as a chicken ceaser salad, or as complicated as tamales. But I try to prep things that are fast, keep well over a period of time, and reheat well if need be. 

Things that prep well are: salads (dressings always on the side, or else things get soggy) pastas with sauce, shredded pork, chicken or beef, chicken breast, roasts, chili, stew, wraps (condiments on the side for the same reason as above) egg cups (recipe will come later) fresh fruits and vegetables too, yogurt parfaits (granola on the side) cutie orange fruit, peel on bananas, pomegranates, almost anything can be prepped beforehand with some assembly required. 

Things that don’t prep very well: runny yolk eggs, avocado, most fish (salmon actually preps pretty well), fried or crispy anything (trust me it will get soggy) sandwiches on soft bread (if you are going to do a sandwich, make your “filling” and keep the bread and condiments separate and assemble when you are ready to eat) pre cut apples tend to get brown no matter what you do with it so better to eat out of hand. 

List 2: now that you know what you are making write down all of your ingredients (and quantities) then, go into your pantry and find what you have and don’t have (I cross things out as I go) there is nothing worse then getting home after a big grocery hall and realizing you forgot or ran out of something and have to run back to the store. 

List 3: re-write your final grocery list. Write it out with the layout of your local grocery store in mind trust me this will save you boat loads of time and steer you away from temptation. So mine is written out as produce, deli meat, raw meat, canned/box items (by aisle, I have my local store layout memorized by now), frozen, dairy, and finally non-food items (toilet paper, “to-go’s”, etc) 

A note on “to-go’s” this is what all of my finished meals come packaged in. They are disposable cheap Tupperware containers that I can wash and use again (or throw out if they get gross or I forget them in my car for 2 weeks). I use the square ones for my meals, small deep ones for fruits and vegetables, and bowl types for stews, soups, and chilis. 

Now comes the legwork, when you get to the store stick to your list! I cannot stress this enough. I pre-plan all of my snacks before hand and write down what I’m getting. I used to go to the store and grab a box of cookies, or candy, or things I just didn’t need that were unhealthy or a waste of money. Stay strong, it all pays off, you might want those cookies now but in a few months you won’t even give them a second glance. Be prepared to spend around 30-60 minutes at the store depending on your haul. Try to go as early as time will allow, my local store doesn’t re-stock throughout the day so in order to get the best produce and meat I have to beat the Sunday crowd. Plus if your store doesn’t carry something, this gives you time to adjust your recipe or find a substitute (I have googled substitutes from my phone numerous times right there in the store) once you are finished, treat yourself to a cup of coffee (we have a Starbucks in my local store) this perks me up and prepares me for my prep day ahead. 

Now throw it all in your car and hurry home. Put away the frozen and perishables like meat and produce. Now grab your first list with recipes and read them over again before you begin to make sure nothing has to marinade for an hour, has to sit, bakes for 4+ hours etc. 

The next step is actually prepping, this will be a separate post so you don’t get overwhelmed by reading a novel of tips and tricks, trust me prep is easy once you get all of the above done. Stay tuned. 

Love

The meal prep princess